Wednesday, April 22, 2015

Mengganti Control Intermittent Wiper Toyota Great Corolla AE101

Wiper Toyota Great Corolla dengan kode engine AE101digerakkan dengan sebuah modul kontrol. Modul ini mengatur kecepatan penyapuan dengan mode Intermittent, Slow dan High serta mengatur fungsi air pembersih kaca (Washer). Wiper Control tersebut letaknya dibelakang stir sebelah kiri seperti gambar dibawah ini:
Fungsi Intermittent wiper mobil saya tidak berfungsi sehingga cukup merepotkan ketika hujan gerimis saya harus bolak balik menarik tongkat wiper dengan jeda waktu tertentu. Karena fungsi intermittent ingin difungsikan kembali, maka saya akan menggati modul timer tambahan agar penyapuan dengan delay waktu tersebut dapat difungsikan kembali.

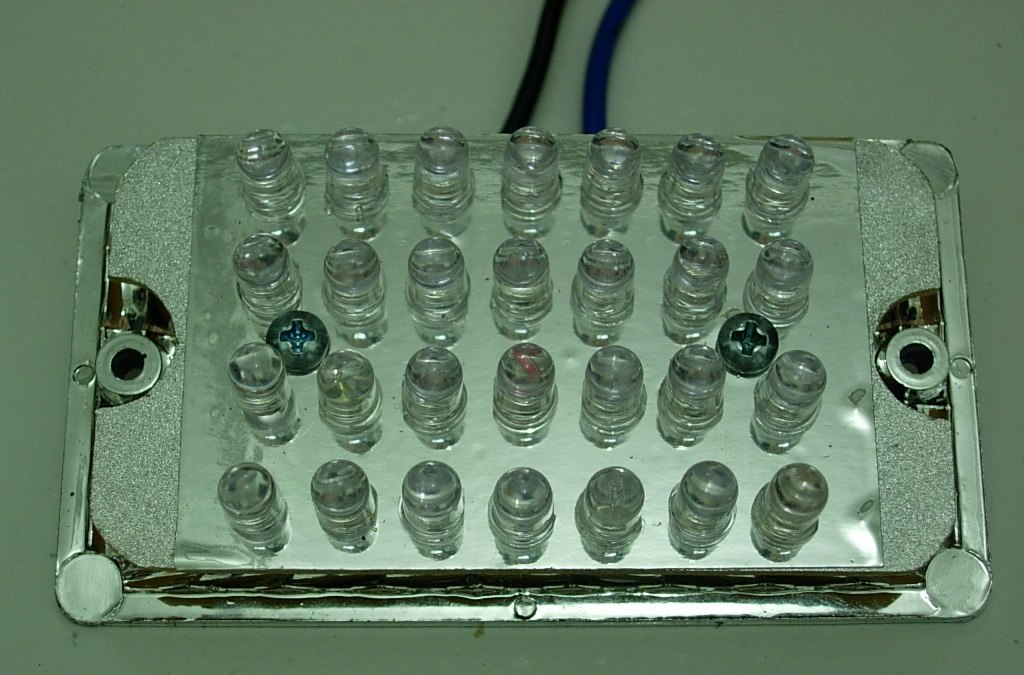
Setelah semua baut tutupnya dibuka, terlihat jalur koneksi PCB seperti terlihat pada gambar berikut:


Terdapat kabel penghubung antara modul dengan motor wiper. Saya beri catatan dalam gambar tersebut untuk menunjukkan fungsi dari masing-masing kabel tersebut.

Kemudian untuk memasang modul timer tambahan ada beberapa jalur yang diputus dan disambungkan seperti gambar berikut.

Modul timer akan aktif apabila tongkat switch digeser ke posisi Intermittent, tegangan akan masuk kedalam modul timer tersebut dan akan mengeluarkan pulsa negatif dengan delay waktu tertentu untuk menggerakkan relay penggerak motor wiper.

Setelah melakukan setting waktu yang sesuai, modul tersebut dipasang kembali sehingga fungsi intermittent dapat berfungsi kembali.

Demikian, semoga artikel ini dapat berguna.

Terimakasih

- Andry -


 COROLLA |  SWITCH RELAY COMPUTER

Thursday, May 30, 2013

DIY - Changing Car Bulb Lamp to Superbright LED

I've done the first experiment replacing incandescent light bulbs with LED light dot matrix. From the experimental results obtained that apparently turns a rather high heat in the resistor. This is because that too much current flowing in the resistor. Another problem is the brightness of the light produced is less.


o overcome these problems so I tried to replace it with a dot matrix LED Superbright LED. Dot Matrix LED Superbright but hard to find in the market. Therefore I use a set of 3 mm LED Superbright arranged into a collection of 5x7 LEDs.


4 x 7 Superbright LED 


Tuesday, May 28, 2013

DIY - Changing Car Bulb Lamp to LED

The reason I am replacing incandescent light bulb to LED lights is because the advantages of LED lighting are:
  • Size: LEDs can be very small and are easily populated onto printed circuit boards. 
  • Efficiency: LEDs produce more light per watt than incandescent bulbs. Their efficiency is not affected by shape and size, unlike light bulbs. 
  • Focus: The solid package of the LED can be designed to focus its light. light bulb sources often require an external reflector to collect light and direct it in a usable manner.
  • Slow failure: LEDs mostly fail by dimming over time, rather than the abrupt burn-out of incandescent bulbs.
  • Shock resistance: LEDs, being solid state components, are difficult to damage with external shock, unlike incandescent bulbs which are fragile. 
  • Color: LEDs can emit light of an intended color without the use of the color filters that traditional lighting methods require. This is more efficient and can lower initial costs. 
  • Lifetime: LEDs can have a relatively long useful life. One report estimates 35,000 to 50,000 hours of useful
  • life: though time to complete failure may be longer. Incandescent light bulbs at 1,000–2,000 hours. 
  • On/Off time: LEDs light up very quickly. A typical red indicator LED will achieve full brightness in microseconds. 


Wednesday, May 22, 2013

Draw an 3D Dead Thing

Find The Object

Today I want to draw a sketch that has a more 3D effect. In the first picture I have tried to draw animals as a living thing. While in the second picture I drew a dead thing. In the picture this time, I will illustrate an object which is beginning in the form of living things, but now has become a dead thing! I will draw fingers skeleton!

Kinda surprised when I decided to draw this object. But after I saw the examples of existing skeleton picture, it turns out this thing has so much detail and should be described by proportional in each section. I hope I will be able to successfully draw this object.

Sketching The Object

I use a pencil to draw a sketch and shading shadow objects. To get proportional picture, I had to experiment with erasing and redraw several times.

Sketching 


Tuesday, May 21, 2013

Another 3D Picture

Find The Object

After I tried to create my first 3D image, I was interested in the art of drawing techniques. I want to go back to try the other drawing objects. This time the conditions are the same as when I drew the first 3D images, I was confused about the object that I want to sketch. I look around my desk, so many things can be drawn. Finally I found a wallet with a zipper lid. Arose the idea to draw this object by adding 3D effects.

Sketching The Object

At the beginning I sketch the object. Slightly different from the first picture, this time besides using a pencil, to reinforce the character of the image, I thickened with a pen.


1st 3D Pencil Drawing

Find The Object

It crossed my mind to try to draw a three-dimensional object. Then I tried to find information about the 3D painting on the internet. There have been many artists who can draw 3D with very realistic results. Media used to draw diverse as canvas, paper or wall. During free time I like to also draw using pencil. For a moment I was confused about the object that I want to sketch. I was also wondering how to start the 3D image. My eyes were looking around the room and try to find interesting objects and suddenly a lizard crawling on the walls. Well this seems interesting to draw this little creatures. But seeing the small size might be a bit difficult to object. Finally I got an idea to enlarge the little lizard into a gecko. 


Sketching The Object

I try to find references and ideas on the internet about the gecko image examples and finally I get the sample images gecko with a 3D effect. The effect is was made by pulling its tail.The first step I did was draw by section gecko's body from head to tail as well as any detail that rough skin. To get the 3D effect that is more real, the image that will be my gecko tail lift.

Sketch Drawing